|
Information in Sage can be sent in a spreadsheet using a MyAssistant Spreadsheet Template. Spreadsheet Templates define a spreadsheet's content and layout.
The following outlines the possible steps to create a Spreadsheet Template. Depending on the desired spreadsheet(s) sent by the Task, some steps can be skipped. These steps begin in the Email step of Task Setup:
1.Specify columns in spreadsheet: Select the columns that will be in the spreadsheet by clicking & dragging Sage fields from the list of available information on the right side of the window to the table at the bottom. The table will be used to create a spreadsheet.
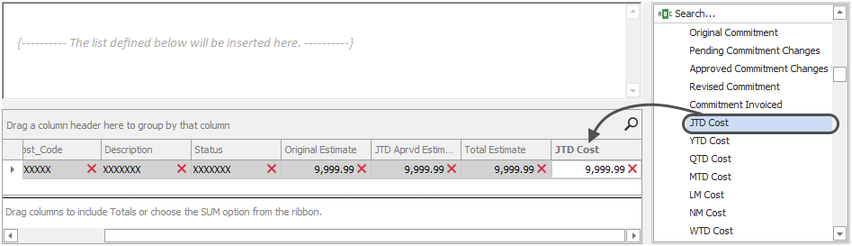
The list on the right side of the window contains all the information that can be accessed (grouped by Sage record) based on what you're sending a spreadsheet of attached to the email. Click here for a table that helps identify what record information is stored in based on where it's viewed or entered in Sage.
2.Create Spreadsheet Template: Create the template MyAssistant will use to send spreadsheets by clicking "Spreadsheet Template" in the ribbon and selecting "Use Notification List"
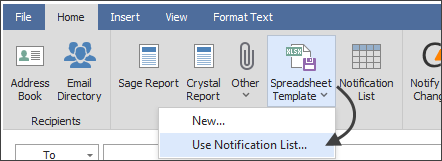
This will open a template containing the fields from the table at the bottom of the Email step
3.Resize Columns: Change the width of any column in the spreadsheet by clicking and dragging its right edge to the left or right
.png)
4.Preview the spreadsheet: Review the spreadsheet's content, sort order and layout by clicking "Preview" in the ribbon
5.Update the title: Change and/or move the title of the spreadsheet placed in cell A1. MyAssistant uses the Subject line from the Email step of Task Setup to prefill the spreadsheet title
6.Add columns: Right-click on a column and select "Insert" to add a column to the left of the one selected in the Spreadsheet Template
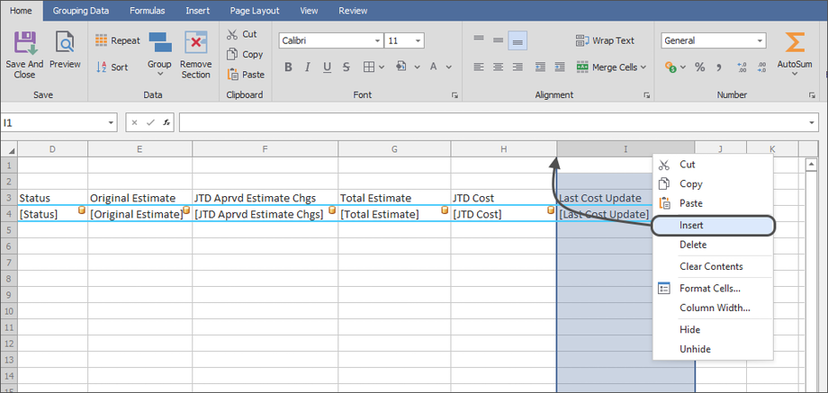
Repeat as desired to add as many columns as desired to a spreadsheet
7.Add information: Add any spreadsheet formulas (for example: "=D4+E4") by selecting a blank cell in the Repeat section (blue box labeled "Detail") and typing in a spreadsheet formula, or by dragging a Sage field from the list on the right into an open cell
.png)
8.Set the spreadsheet's sort order: Change the order information appears in the spreadsheet by selecting any cell in the Repeat section, then clicking the "Sort" button in the ribbon. Choose how the spreadsheet will be sorted (and what information you can group by) in the window that opens:
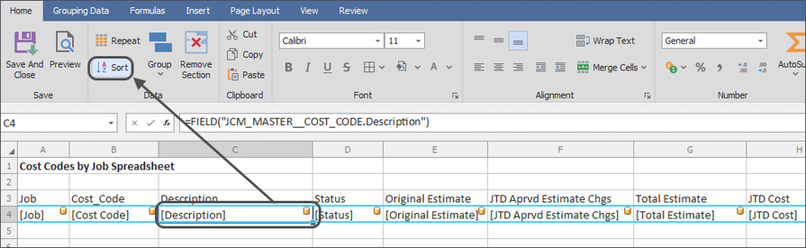
Click here for more information on sorting a spreadsheet
9.Add rows for overlines: Right-click on the row with the Sage fields and select "Insert" to add a row above it that will be used for an overline.png)
10.Re-set the Repeat Section: Click and highlight the cells in the inserted row and the row below, then click "Repeat" to re-set the Repeat section
.png)
11.Add the overline: Add an overline to the spreadsheet by selecting the cells in the top row of the Repeat section, clicking the "Group" button in the ribbon and selecting "Group Header". Choose the field you want to group by in the window that opens, then click OK.
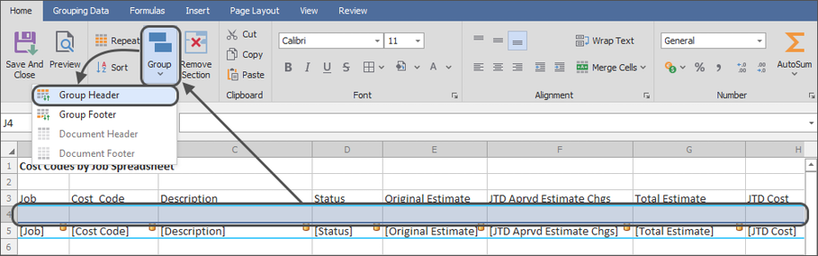
Click here for more information on Grouping, including Group Footers and having multiple groups in a spreadsheet
12.Add information to the overline: Click and drag any Sage fields you want to add to the Group overline from the list on the right side of the screen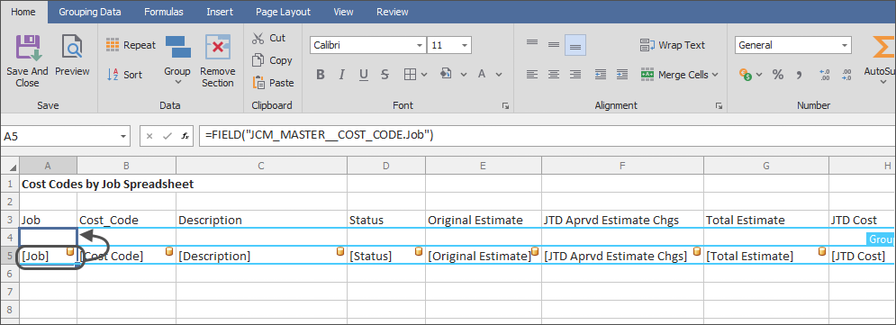
13.Add a section for grand totals: Add a section that displays at the end of the spreadsheet by clicking and highlight cells under the Repeat section, then clicking "Group" and selecting "Document Footer"
14.Add a grand total: Add a sum at the bottom of a column by clicking the blank cell in the Document Footer under cell that will show a number, then clicking the "AutoSum" button and selecting "Sum"
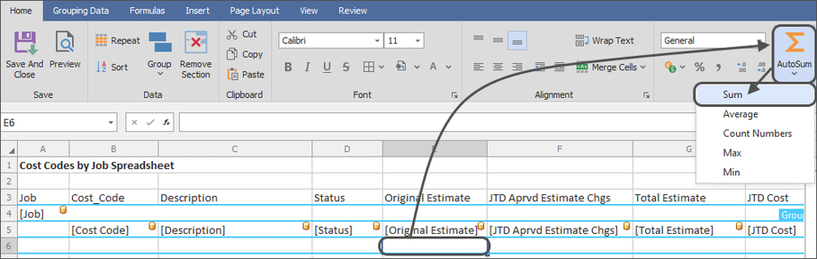
Click here for more information on totals, including having multiple subtotals and a grand total in a spreadsheet
15.Preview the spreadsheet: Confirm the content, sort order and layout of the spreadsheet by clicking the "Preview" button in the ribbon. Close the preview window using the "Close" button in the ribbon or via the "X" in the top-right of the window.
16.Save the spreadsheet: When no other changes are needed, save the spreadsheet template by clicking the "Save and Close" button in the ribbon
17.Name the Spreadsheet: Choose the name of the spreadsheet attached to the email(s) by accepting the default name provided, or entering a new title in the field
18.Choose the File Type: Choose whether the attachment will be an Excel Workbook, a PDF, plain text or a CSV file:
.png)
Click OK when finished to save the spreadsheet template to the Task
19.Choose who should be emailed: Specify the recipients that should be sent a spreadsheet by typing email addresses into the "To" & "Cc" lines in the email step, or by adding an Email Directory to send each person their information.
20.Finish Task Setup: When finished in the Email step, proceed to the Options step (the last step of Task Setup) by clicking the "Next" in the bottom-right of the window.
Related Links
Send a Spreadsheet Overview
What to Send - Spreadsheet
Repeat Section
Sort
Grouping
Document Headers & Footers
Totals
|

