|
MyAssistant can automatically generate and send reports and documents to recipients.
The following outlines the possible steps to attach and send a report where each recipient gets the same information. Depending on the report(s) sent by the Task, some steps can be skipped. These steps begin in the Email step of Task Setup:
1.Find the report: Identify if the report that will be attached to the Task is currently on a Sage Reports menu. This may in part depend on what software was used to create the report.
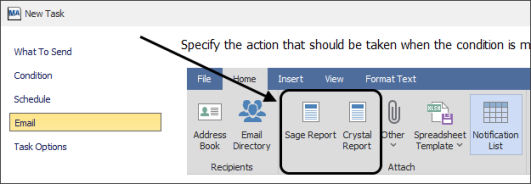
2.Choose how to attach the report: If the report is already on a Reports menu in a Sage program, click the "Sage Report" button in the ribbon to attach the report. If the report was created in the Crystal Reports software and is not on a Sage Reports menu, click the "Crystal Report" button to attach it directly to the MyAssistant Task.
|
Note: If a report was created in Sage Report Designer, it must be attached to a Sage Reports menu before attaching it to a MyAssistant Task. Almost any report on a Reports menu in Sage 300 can be attached to a MyAssistant Task.
|
3.Select the report (Sage Report): If the "Sage Report" button was clicked, navigate to and select the report in the window that opens. This window shows all Sage reports that can be accessed, grouped by application:
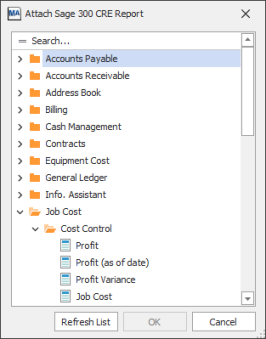
Tip: Use the search bar at the top of the list to quickly find the desired report
|
4.Select the report (Crystal Report): If the "Crystal Report" button was clicked, use the window that opens to navigate to where the report is saved on a computer.
.png)
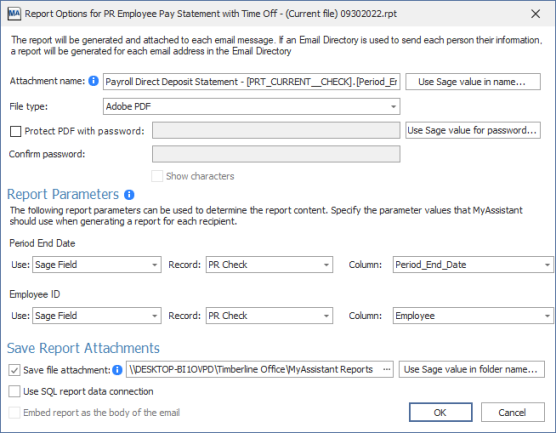
5.Fill out the prompts: After attaching a report to a Task, a window will open with several options to fill out or confirm. Start with the section labeled Report Parameters -- any prompts that need information to fill out the report are displayed in this section. Prompts can be filled in with one of three options: a specified value, information from a Sage field, or a MyAssistant Formula.
|
Note: The content of the report can be independent of the Task Condition -- the key is the prompts on the report and what Sage information (if any) is being used to fill out the prompts. For more information, see Send Each Person Their Information
|
6.Name the attachment: Fill out the "Attachment name" section at the top of the window to set the name of the report or document attached to the email(s) sent by the Task. Click "Use Sage value in name..." to use information as part of the attachment name. For example: When sending each Customer their monthly statement, add the "Name" field from the AR Customer record to the attachment name.
7.Choose the attachment type: Crystal Reports attached to a Task can produce a PDF, an Excel spreadsheet, a plain text document, or Comma Separated Values (CSV) file. Reports attached from Sage always create PDFs.
8.Set the password: If sending a PDF, check the box and enter the same password in the two fields that will be required to open the document. To set a unique password by recipient, click the "Use Sage value for password..." button and select a field that has a unique value for each person who will be sent an email. For example: when sending each Employee their weekly pay stub, select the MyAssistant Formula "Last 4 digits of Social Security Number" as the password. This will require each recipient to enter the last four digits of their SSN in order to open their pay stub
|
Tip: Depending on the password selected, a generic sentence can be added to the message body that tells them their password while still being secure. For example: If sending pay stubs that are password-protected with the last four digits of the recipients Social Security Number, add the phrase "Your password is the last 4 digits of your SSN" to the message section in the Email step.
|
9.Pick where to save a copy of the report: MyAssistant can save a copy of each attached report, document or spreadsheet sent by the Task to a location on a computer. Check the box to save a copy of the report, then choose where the report will be saved. Click here for more information
10.Confirm Report Settings: Review all the report options selected and information specified, then save changes by clicking "OK" to close the window
11.Choose who should be emailed: Specify the recipients that should be sent a spreadsheet by typing email addresses into the "To" & "Cc" lines in the email step, or by adding an Email Directory to send each person their information.
12.Add a message: Type a message in the middle section of the Email step that explains what each recipient is being sent, and any next steps recipients need to take. When sending each person their information, Sage fields can be added to the message to personalize the content by recipient. For example: When sending each employee their pay statement for the most recent period end date, add the "Period End Date" field from the PR Check record, or the Employee Name from the PR Employee record.
|
Tip: Click here for a table that helps identify what record information is stored in based on where it's viewed or entered in Sage.
|
13.Finish Task Setup: When finished in the Email step, proceed to the Options step (the last step of Task Setup) by clicking the "Next" in the bottom-right of the window.
Related Links
Send Reports & Documents Overview
Send Each Person Their Information
Saving Copies of Emailed Attachments
|

